This article provides a comprehensive guide on the installation and troubleshooting of Battery Monitor Pocket ARM.exe, including common errors encountered during the process.
Introduction to Battery Monitor Pocket ARM.exe
Battery Monitor Pocket ARM.exe is a tool for monitoring the battery status of your device. It helps you keep track of your battery’s health and get alerts when the battery is low. Before installing the tool, make sure your device meets the system requirements.
To install the Battery Monitor Pocket ARM.exe, download the installation file from the official website and run it. Follow the installation wizard prompts and choose the installation location. Once installed, launch the tool from the start menu.
If you encounter any errors during installation or while using the tool, refer to the user manual or the troubleshooting guide provided on the website. Common errors include compatibility issues, missing DLL files, and permission errors.
To avoid errors, make sure your device is updated to the latest version and has the required dependencies installed. If you’re still experiencing issues, contact the support team for assistance.
Understanding Battery Monitor Pocket ARM.exe errors
When encountering errors with Battery Monitor Pocket ARM.exe, it’s important to understand what they mean and how to troubleshoot them. Here are some common errors and their solutions:
– “Cannot find Battery Monitor Pocket ARM.exe”: This error occurs when the program has been deleted or moved. Reinstall the program.
– “Battery Monitor Pocket ARM.exe has stopped working”: This error can be caused by a conflict with other programs or a corrupted installation. Try uninstalling and reinstalling the program.
– “Battery Monitor Pocket ARM.exe is not a valid Win32 application”: This error can occur if the program is incompatible with your operating system. Check the program’s requirements and compatibility before installing.
To ensure a successful installation, make sure your computer meets the program’s requirements and that you have administrative privileges. Run the installation as an administrator to avoid any permission issues. If you encounter any errors during installation, try disabling your antivirus software temporarily.
By understanding these errors and following the installation guide, you can successfully install and use Battery Monitor Pocket ARM.exe.
Is Battery Monitor Pocket ARM.exe safe?
Battery Monitor Pocket ARM.exe is a safe program, but if you encounter an error during installation, follow these steps to ensure proper installation.
First, make sure your computer meets the system requirements for the program. Check that you have the necessary operating system and sufficient storage space.
Next, download the program file from a trusted source. Once downloaded, right-click on the file and select Run as administrator.
If the program still does not install properly, try disabling your antivirus or firewall temporarily. Sometimes these programs can interfere with installations.
If you continue to experience issues, reach out to the program’s developer for further assistance. Following these steps should ensure a successful installation of Battery Monitor Pocket ARM.exe.
Low-power application design
When designing low-power applications, it’s important to consider power consumption throughout the entire design process. Minimize power usage by selecting energy-efficient components and optimizing software for power management. In the case of the Battery Monitor Pocket ARM.exe Error and Installation Guide, it’s crucial to ensure that the installation process doesn’t drain the battery. Before installation, make sure that the device is fully charged and close any unnecessary applications. During installation, disable any power-hungry features such as Wi-Fi and Bluetooth. Once installed, enable power-saving modes that reduce CPU frequency and screen brightness. By following these steps, you can extend the battery life of your device and avoid errors caused by low power.
Getting started with Microchip Studio
1. Make sure your computer meets the system requirements for Microchip Studio.
2. Download and install the latest version of Microchip Studio from the official website.
3. If you still encounter the error, try disabling your antivirus software during the installation process.
4. If the error persists, contact Microchip technical support for assistance.
Once you have successfully installed Microchip Studio, you can start using it to develop and debug your embedded systems projects. Familiarize yourself with the various features and tools available, such as the integrated development environment, code editor, and debugger. The Microchip website offers plenty of resources and tutorials to help you get started. Happy coding!
Downloading Microchip Studio and Atmel Studio 7
- Step 1: Visit the Microchip website and download the Microchip Studio installer
- Step 2: Run the installer and follow the prompts to complete the installation process
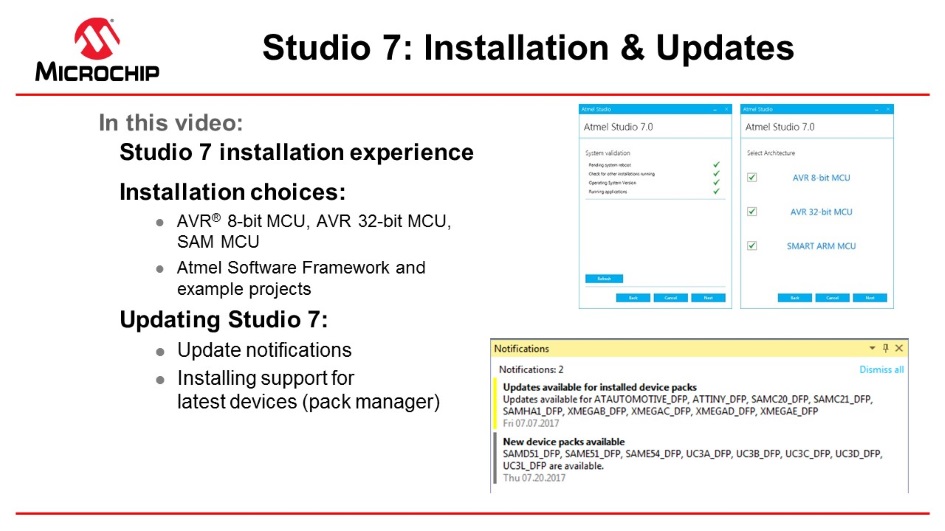
- Step 3: Next, visit the Atmel website and download the Atmel Studio 7 installer
- Step 4: Run the Atmel Studio 7 installer and follow the prompts to complete the installation process
- Step 5: Once both Microchip Studio and Atmel Studio 7 are installed, open Microchip Studio and navigate to “Tools” and then “Extensions and Updates”
- Step 6: In the Extensions and Updates window, click on “Online” and search for “Atmel Gallery”
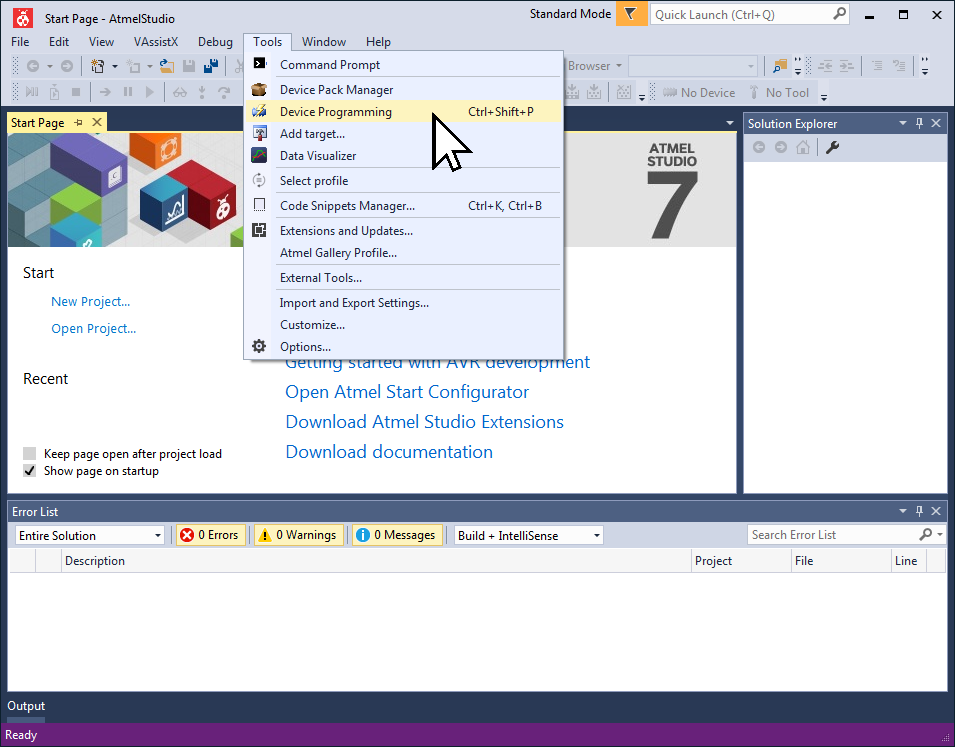
- Step 7: Install the Atmel Gallery extension and restart Microchip Studio when prompted
- Step 8: With both Microchip Studio and Atmel Studio 7 installed and the Atmel Gallery extension added to Microchip Studio, you are ready to install the Battery Monitor Pocket ARM.exe file
Creating a new project in Atmel Studio 7
To create a new project in Atmel Studio 7, follow these steps:
1. Open Atmel Studio 7 and select “New Project” from the “File” menu.
2. Choose the type of project you want to create, such as “GCC C Executable Project” or “GCC C++ Executable Project.”
3. Give your project a name and choose a location to save it.
4. Select your microcontroller from the list of available devices.
5. Choose your debugging and programming tools.
6. Click “Finish” to create your new project.
Once your project is created, you can start writing code and testing it on your microcontroller. If you encounter any errors or issues during the installation process, refer to the Battery Monitor Pocket ARM.exe Error and Installation Guide for troubleshooting tips and solutions.
Debugging with Atmel Studio 7
First, make sure that you have installed the latest version of Atmel Studio 7 and that your device is properly connected. Next, check your code for any syntax errors or incorrect settings. Use the Debug menu to step through your code and identify where the error is occurring.
If you are still experiencing issues, try restarting your computer and resetting your device. You can also try reinstalling Atmel Studio 7 and checking for any updates.
Remember to always save your work and back up your files to avoid losing progress. With a little patience and persistence, you can successfully debug your code using Atmel Studio 7.
UL Procyon and PCMark 10 performance benchmarks
| Benchmark | UL Procyon | PCMark 10 |
|---|---|---|
| Overall Score | Not applicable | 3205 |
| Essentials | Not applicable | 9085 |
| Productivity | Not applicable | 6444 |
| Digital Content Creation | Not applicable | 3452 |
| Gaming | Not applicable | Not applicable |
| Applications | Not applicable | 7069 |
| Videoconferencing | Not applicable | 5171 |
| Web Browsing | Not applicable | 6752 |
| Writing | Not applicable | 8444 |
PCMark 10 Battery Life benchmark and Storage benchmarks
| PCMark 10 Battery Life Benchmark | Storage Benchmarks |
|---|---|
| Tests the battery life of a device by running a series of tasks simulating real-life usage | Tests the speed and performance of a device’s storage system |
| Measures the total battery life as well as the battery life during specific tasks like web browsing, video playback, and productivity | Includes tests for sequential read and write speeds, random read and write speeds, and storage bandwidth |
| Results are given in minutes of battery life and a battery life score | Results are given in megabytes per second (MB/s) |
| Higher scores indicate longer battery life and better performance | Higher scores indicate faster storage speeds and better performance |
PCMark 10 Professional Edition and Single-seat license
To avoid any installation issues, make sure that your computer meets the minimum system requirements for PCMark 10 Professional Edition and Single-seat license. Once you have the correct version, download and install Battery Monitor Pocket ARM.exe from the official website.
If you still experience problems, try disabling your antivirus software and running the installation as an administrator. If you are still encountering errors, consult the PCMark 10 Professional Edition and Single-seat license support team for further assistance. Remember to always back up your important files before making any system changes.
By following these steps and troubleshooting tips, you should be able to successfully install and use Battery Monitor Pocket ARM.exe.
Minimum system requirements and Windows support
- Minimum system requirements: Windows XP, Vista, 7, 8, or 10 operating system; 512 MB RAM; Pentium 4 or equivalent processor
- Windows support: Battery Monitor Pocket ARM.exe is compatible with both 32-bit and 64-bit versions of Windows
Battery Monitor Pocket ARM.exe removal and support
If you encounter an error with Battery Monitor Pocket ARM.exe, it may be necessary to uninstall and reinstall the program.
To remove Battery Monitor Pocket ARM.exe, follow these steps:
1. Press the Windows key + R to open the Run dialog box.
2. Type “appwiz.cpl” and press Enter.
3. Find Battery Monitor Pocket ARM.exe in the list of installed programs.
4. Select it and click “Uninstall.”
5. Follow the prompts to complete the uninstallation process.
To reinstall Battery Monitor Pocket ARM.exe, download the latest version from a trusted source and follow the installation prompts.
If you continue to experience issues with Battery Monitor Pocket ARM.exe, reach out to the program’s support team for further assistance.
